New England Pillow with Sashing Applique

Instagram: @daisitoegel
Website: www.flowersew.com
------------------------------------------------
Size: 18in square
Skill level: Beginner
Pattern notes:
- Please read all instructions before beginning.
- Seam allowance is ¼” unless noted otherwise.
- WOF = width of fabric: assume 21” for Fat Quarter (FQ) and 42” WOF for yardage (YD).
Tools:
OLFA QR-6x12 6" X 12" Frosted Acrylic Ruler
OLFA RM-CG 12" X 18" Green Double-Sided, Self-Healing Rotary Mat
OLFA 45mm RTY-2/C Quick-Change Rotary Cutter, Aqua

Fabric Requirements:
|
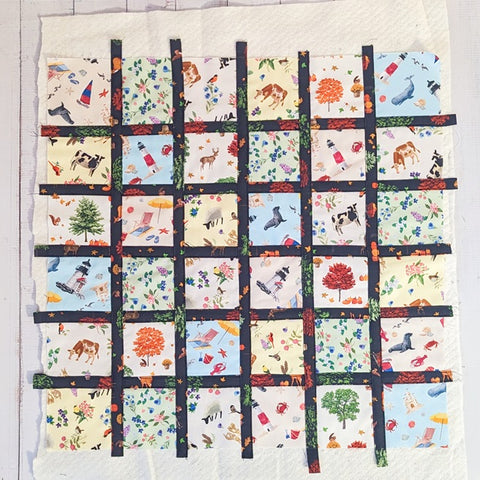
6 x 6 grid patchwork | 3in finished squares | 18.5in unfinished block |
|
|
Color A (cA) = Spring Blue |
1 FE |
|
Color B (cB) = Spring Cream |
1 FE |
|
Color C (cC) = Flowers |
1 FE |
|
Color D (cD) = Summer Cream |
1 FE |
|
Color E (cE) = Summer Yellow |
1 FE |
|
Color F (cF) = Fall Cream |
1 FE |
|
Color G (cG) = SASHING APPLIQUE = Fall Black |
1 FQ |
|
Backing |
1/2yd |
|
Binding = Leaves |
1 FQ |
|
Batting |
20in square |
Cutting instructions:
Color A through F = cut (1) 3 1/2in x WOF strips; sub-cut (6) 3 1/2in squares from each strip;
Color G = sashing applique strips = cut (10) 1 in x 19in strips; (these strips are NOT cut on the bias, cut them on the straight grain);
Backing = cut (2) 14in x 18 1/2in rectangles;
Binding: Cut (4) strips 2 1/2” x WOF, join the strips and prepare the binding.

Sew the block:
- Sew (6) rows of (6) 3 1/2in squares.
- Organize each row so each of the (6) colors/fabrics are distributed (1) square on each row.
- Press seams to opposite directions, rows 1, 3 and 5 press to the left, and rows 2, 4 and 6 press to the right. This will help nesting seams precisely.
- Sew the rows together, use pins or clips to hold the rows together before sewing. Start sewing row 1 and 2, and add the other rows in order.
- TIP: If you decide to fussy cut the fabric squares, attention to the correct position when you sew the rows.
- Press the quilt block when you finish.

Prepare the applique binding strips:
- Fold each 1in x 19in strips of fabric cG on the long edge in half, with wrong sides of the fabric together, open and press the long edges 1/4in towards the center crease.
- You can also use a bias tape maker tool for this, even though this strip is not cut on the bias, it will work in the same way.
- Repeat this process for all strips.

Sew the sashing applique:
- The strips will be attached in between the block’s square seams, to cover them. This will mock a sashing effect on the block.
- Start aligning one sashing strip on top of a seam in between two square rows on the block, pin if preferred.
- Align the presser foot and the needle to be 1/8in far from the edge of the strip. It is recommended to use a matching thread color in this step.

- Sew on each side of the sashing strip to applique.
- Repeat this process for all (10) strips.

- After finishing the strip applique, the block is ready to be trimmed.
- Press the block before trimming.
Prepare the envelope closure for the pillow:

- Press both 14in x 18 1/2in rectangles.
- On the long edge of each, fold twice 1in in to enclose the raw edge. Press and pin.
- Sew to finish 1/8in on each side of the 1in folded edge.

- With the quilted piece facing the wrong side up, lay the backing rectangles overlapping to create the envelope closure.
- Clip or pin along the edges and sew using 1/8in seam allowance.

- Bind using your favorite method to finish the pillow.

- Add the pillow insert.


